Infill refers to the internal structure or pattern used to fill the interior of a three-dimensional object being printed. Infill is like the hidden support system of 3D printing, providing the interior structure that determines the strength and efficiency of the printed object. By selecting different infill patterns and percentages, you can fine-tune the balance between strength, material usage, and printing time to suit your specific needs.
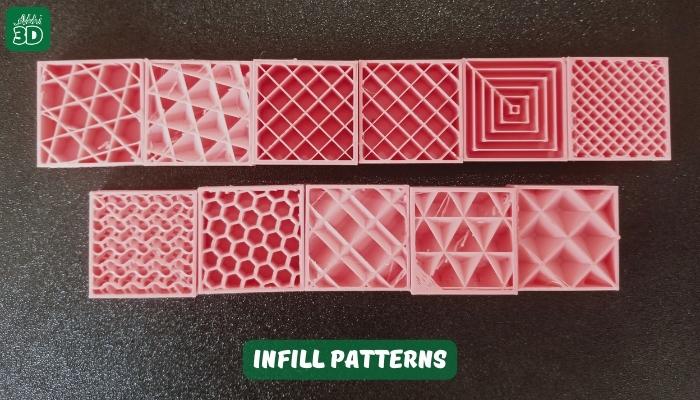
Table Of Contents
What Is Infill And Why It Is Important?
In 3D printing, “infill” refers to the internal structure of a 3D-printed object. It represents the lattice or pattern used to fill the empty space within the object, and it is not typically visible from the outside.
Why Infill Is Important:
Infill serves several important purposes:
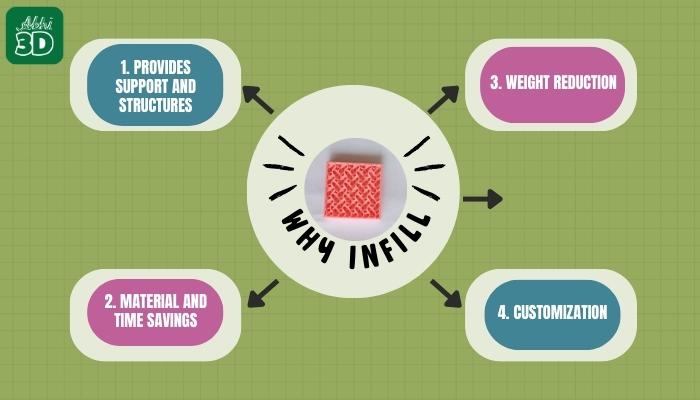
Support and Structure: Infill provides structural support to the 3D-printed object. It prevents the walls of the object from collapsing during the printing process and maintains the object’s shape.
Material And Time Savings: Using infill reduces the amount of material and time used, making the 3D printing process more efficient and cost-effective. Printing solid objects would be wasteful in terms of material and time.
Weight Reduction: Infill helps reduce the weight of 3D-printed objects. This is especially important when weight is a consideration, such as in aerospace or robotics applications.
Customization: Infill density and pattern can often be adjusted by the user. This allows you to tailor the object’s properties to your specific needs. For example, you can choose a higher infill density for increased strength or a lower density to save material.
Infill Pattern Types With Pros And Cons:
Infill pattern refers to the interior structure of a 3D-printed object, which is typically designed to be less dense than the outer shell. The choice of infill pattern can have a significant impact on the final 3D-printed object’s properties. Let’s explore popular infill pattern types and find out which pattern should you prefer based on your requirements.
The rectilinear infill pattern is characterized by a grid-like arrangement of lines or struts that run parallel to each other in two mutually perpendicular directions. It forms a lattice structure that provides a good balance between strength, speed of printing, and material usage.
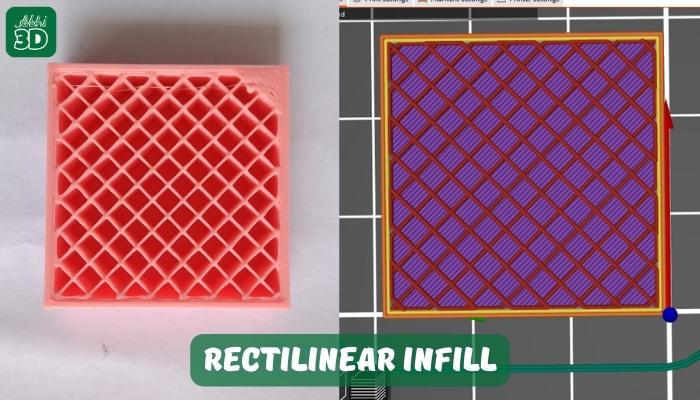
Pros: Rectilinear infill is known for its efficiency in 3D printing. It is a pattern that allows for quick printing times due to its straight lines and simple geometry. This pattern requires less movement from the printer’s extruder, which can greatly reduce the overall printing time.
Cons: One drawback of the rectilinear infill grid pattern is that it does not distribute stress evenly across the object. This can lead to weaknesses and potential failure points. if you are looking for exceptional high strength in your object then consider using a Gyroid, cubic etc pattern.
You can read more about Rectilinear Infill here in detail.
2. Honeycomb Infill:
The honeycomb infill pattern is a popular and efficient design used in 3D printing and additive manufacturing. It plays a crucial role in determining the internal structure of a printed object, providing a balance between material usage and structural integrity. This infill pattern gets its name from the hexagonal cell structure that closely resembles a honeycomb found in beehives.
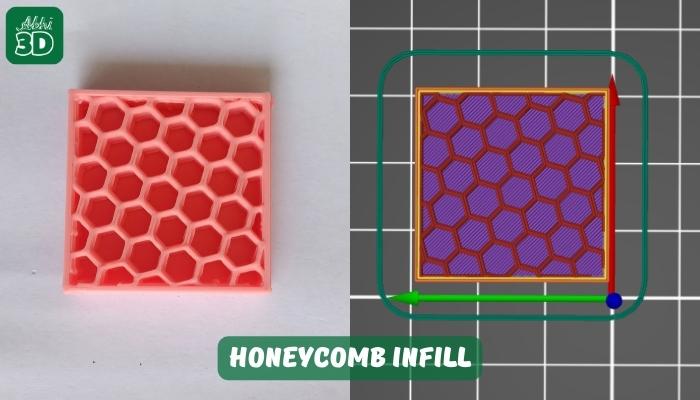
Pros: One pro of honeycomb infill in 3D printing is its efficient use of material. Honeycomb infill patterns are designed to maximize structural integrity while minimizing the amount of material used. This not only reduces material waste but also makes 3D-printed objects lighter, which can be advantageous in applications where weight savings are important, such as in aerospace or automotive components.
Cons: One drawback of honeycomb infill in 3D printing is that it can increase the printing time compared to simpler infill patterns. The intricate honeycomb structure requires more movements and precise deposition of material, which can slow down the printing process. While it enhances the part’s strength, it may not be suitable for projects with strict time constraints, especially when speed is a priority.
You can read more about honeycomb infill here in full detail.
The triangular infill pattern is a widely used design element in 3D printing and additive manufacturing. It is characterized by the use of interconnected triangles to fill the interior space of a 3D-printed object, as opposed to solid or rectilinear infill patterns.
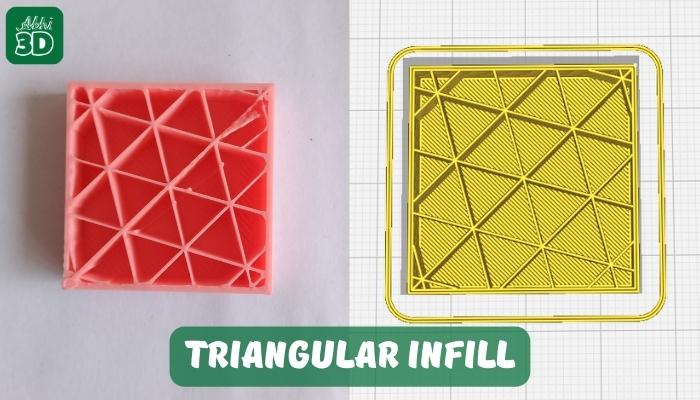
Pros: Triangular infill in 3D printing offers an advantage in terms of material efficiency. The triangular pattern provides sufficient structural support while minimizing the amount of material used, leading to cost savings and reduced material waste.
Cons: The downside of using triangular infill is the impact it can have on surface texture. The triangular pattern may become visible on the external surfaces of the printed object, especially when using a high infill density. This may not be ideal if a smooth and visually appealing finish is crucial.
4. Gyroid Infill:
The gyroid infill pattern is a distinctive and increasingly popular 3D printing infill pattern used to fill the interior of printed objects. Named after the mathematical concept of a gyroid, this pattern features a triply periodic minimal surface. It means that the pattern can be extended infinitely in three dimensions without repeating itself, creating a complex, strong, and balanced structure. This unique design offers both aesthetic appeal and practical advantages in creating 3D print objects.
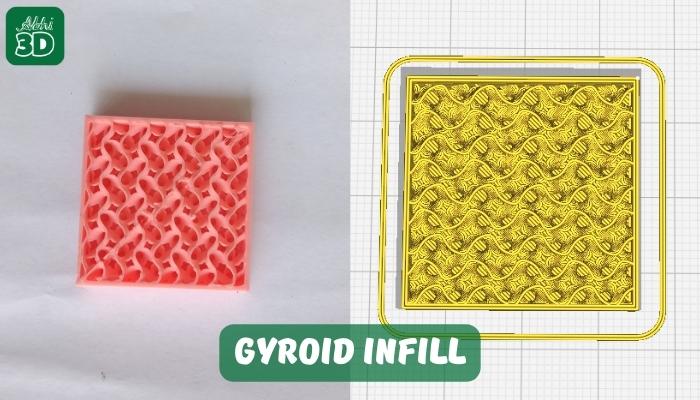
Pros: Gyroid infill is highly efficient in terms of material usage. Its complex, triply periodic minimal structure provides excellent strength and support while minimizing the amount of material required. This helps in creating a strong 3D-printed object with a perfect balance of cost and time savings.
Cons: Gyroid infill pattern can be slightly more time-consuming to print compared to simpler infill patterns. The intricate and complex structure of the gyroid infill may require more time slightly slowing down the overall 3D printing process when compared to other simple infill patterns.
You can read more details about Gyroid Infill here
5. Grid Infill:
A grid pattern in 3D printing refers to a specific type of infill pattern used in the interior structure of a 3D-printed object. The grid pattern, as the name suggests, is characterized by a network of straight, intersecting lines that form a series of squares or rectangles within the object. It is one of the most commonly used infill patterns in 3D printing due to its balance between structural integrity and print speed.
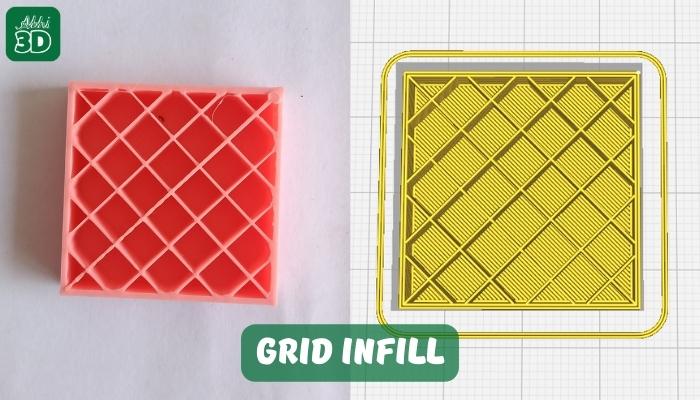
Pros: The grid infill pattern strikes a balance between providing good structural strength and using less material. It’s an efficient choice when you want a sturdy 3D-printed object while conserving filament and reducing printing time.
Cons: Grid infill may not be suitable for all design requirements. It offers a relatively uniform and rigid internal structure, which might not be the best choice for parts that need flexibility, impact resistance, or unconventional internal geometries.
The “Tri-hexagon” infill pattern is a geometric design used in 3D printing to fill the interior of a printed object with a hybrid combination of triangles and hexagons. This pattern is employed to strike a balance between structural integrity and material efficiency. Triangles and hexagons are known for their stability and uniform distribution of support within the object, and by combining them in this pattern, optimizes strength while reducing material usage, making it an effective choice for creating lightweight yet sturdy 3D-printed objects.
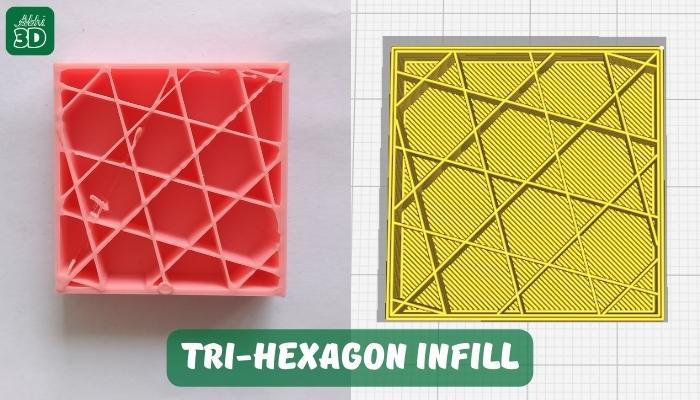
Pros: The Tri-hexagon infill pattern leverages the strengths of both triangles and hexagons, providing excellent structural support, which is essential for creating durable and robust 3D-printed objects. This pattern can improve the overall strength and stability of the printed item.
Cons: The Tri-hexagon infill pattern, with its combination of different shapes, can be more complex to generate in 3D printing software, potentially leading to longer slicing and printing times.
7. Cubic Infill:
The cubic infill pattern is characterized by a grid of cubic cells that are evenly spaced and interconnected, forming a lattice-like structure inside the 3D-printed object. This pattern is designed to provide a good balance between strength and material usage. It is often used when you want an object to be relatively strong but not overly dense, which can save on material and reduce print time compared to solid infill.
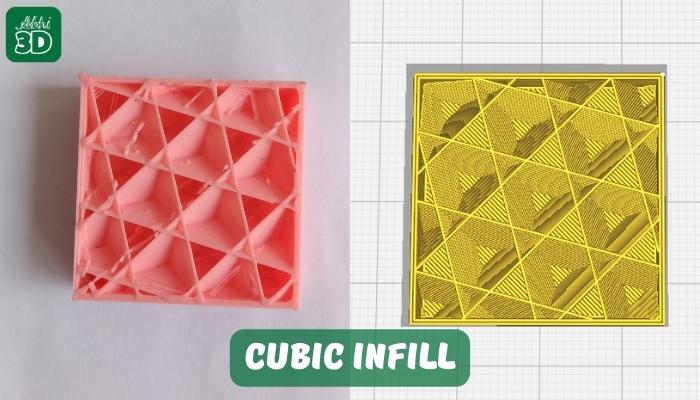
Pros: Cubic infill pattern provides good structural strength to 3D-printed objects. The interconnected lattice of cubic cells helps distribute the load and adds stability to the object.
Cons: Cubic infill pattern can be relatively material-intensive compared to some other infill patterns. The solid, interconnected structure of cubic cells requires more material to fill the interior of the object, which can increase material costs and printing time.
You can read more about Cubic Infill here
Cubic subdivision infill, also known as cubic infill, is a specific type of infill pattern that is characterized by its grid-like cubic structure.
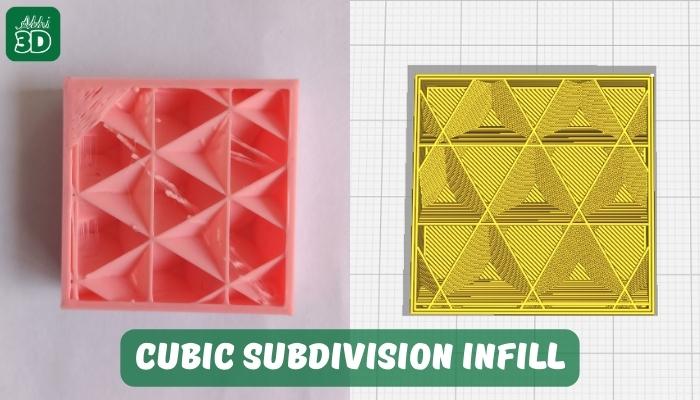
Pros: Cubic subdivision infill provides excellent structural support and stability to 3D-printed objects. Its grid-like pattern offers a high level of rigidity, making it ideal for functional parts that need to withstand mechanical stress and maintain their shape.
Cons: One con of cubic subdivision infill in 3D printing is that it typically consumes more material compared to other infill patterns. The cubic subdivision infill pattern consists of solid cubic structures, which can be less material-efficient than infill patterns like honeycomb or gyroid. This increased material usage can lead to higher material costs and longer print times, making it less economical for some 3D printing projects where material conservation is a concern.
9. Octet Infill:
The octet infill pattern is a strategic lattice structure utilized in 3D printing to fill the interior of objects, balancing structural integrity with material efficiency. Characterized by a repeating network of interconnected octagonal shapes with diagonal connections, it optimizes strength while conserving material. This infill pattern is particularly advantageous when creating 3D-printed objects that demand both robustness and lightweight design, offering an efficient compromise between strength and material conservation in the additive manufacturing process.
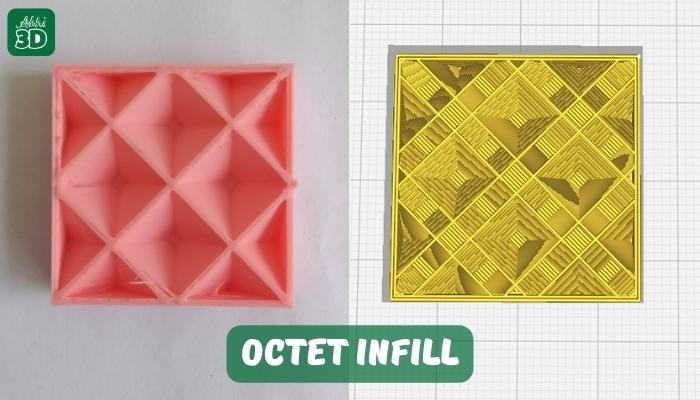
Pros: The octet infill pattern offers excellent structural integrity, making it a suitable choice for 3D-printed objects that require strength and durability.
Cons: It may not be the most time-efficient option for 3D printing, as more intricate infill patterns can be slower to print, potentially affecting production time.
10. Concentric Infill:
A concentric infill pattern is a commonly used infill strategy in 3D printing, where the interior of a printed object is filled with concentric circles or loops. This pattern is distinguished by its circular geometry, making it an appealing choice for various 3D printing projects.

Pros: The concentric pattern provides consistent strength and stability throughout the printed object, making it ideal for parts that require an even distribution of forces, such as load-bearing components or mechanical parts.
Cons: Concentric infill may not provide sufficient support for certain overhanging or complex geometries. In such cases, other infill patterns or support structures might be necessary to achieve the desired print quality and structural integrity.
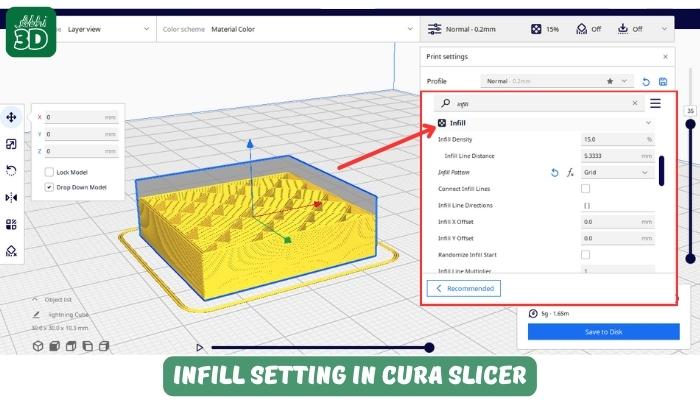
Infill Density Percentage:
Infill percentage is a crucial parameter in 3D printing that determines the density and internal structure of a printed object. It plays a significant role in the overall strength, weight, and functionality of the final 3D-printed item. Infill percentage refers to the amount of material used to fill the internal space of a printed object, as opposed to the outer shell or perimeters.
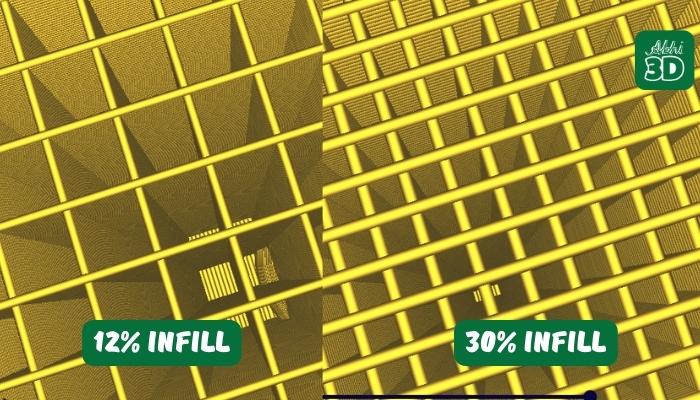
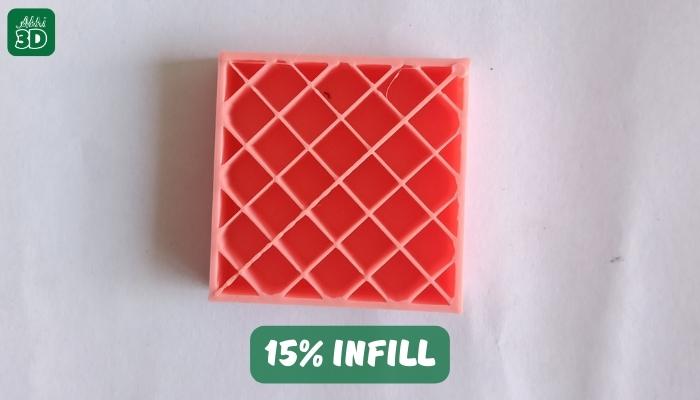
Popular 10-30% Infill In 3D Printing:
10-30% medium infill in 3D printing is a widely used technique in the world of additive manufacturing. This medium infill provides a good balance between strength and print speed.
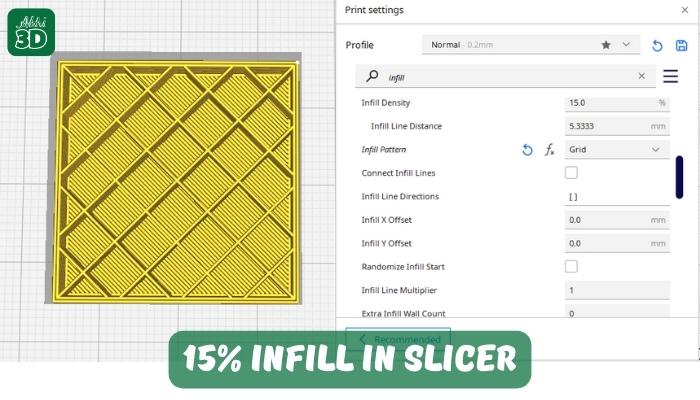
Below you can see I printed a simple object with 15% infill. This infill percentage you might feel it’s low but when you will print it. You will see your printed object still has decent strength.
Pros:
1. Faster Printing: Using medium infill percentages (10-30%) means less material is used, and it speeds up the printing process. You get your 3D-printed object more quickly.
2. Less Material Cost: Since you use less material, it’s more cost-effective. You save money on 3D printing filament, which can add up over time.
3. Lightweight Prints: Lower infill creates objects that are lighter. This is useful if you need to reduce the weight of your 3D-printed parts, making them easier to carry or use in certain applications.
Cons:
Moderate Strength: While medium infill is suitable for many applications, it may not be ideal for parts that require maximum strength, such as load-bearing or high-stress components.
Limited Heat Resistance: Objects with medium infill may have reduced heat resistance compared to high-infill counterparts due to the presence of internal voids.
0 Infill In 3D Printing:
A 3D printing technique that has gained popularity in recent years is “0 infill” 3D printing, also known as “infill-free” or “hollow” 3D printing. Infill serves to add strength to the print, reduce material usage, and shorten print times. However, there are certain situations where printing with 0 infill can be advantageous. In the case of lampshades, you want to allow light to pass through and create interesting lighting effects.

Below is a simple cube I printed with 0% Infill. I stopped printing it after it was 20% complete so you can see its internal structure which is completely hollow from the inside.

Pros:
- Faster Printing: 0% infill reduces print time significantly as there’s no need to fill the interior, making it quicker.
- Material Savings: It requires less filament, saving on material costs.
- Lightweight Parts: Objects printed with 0% infill are lightweight, which can be advantageous for certain applications.
Cons:
- Reduced Structural Integrity: Objects may be less sturdy and have weaker internal support.
- Limited Durability: Parts are more prone to breaking or deformation due to the lack of internal support.
- Hollow Appearance: The interior of the object may be visible, affecting aesthetics for some designs.
You can read our detailed guide on 0 Infill here.
100 Infill in 3D printing:
A 100 infill percentage would mean that the entire object is solid and has no space left while printing the internal structure. This solid infill percentage is preferred in cases like dental implants, prosthetics, prototypes in aerospace, and much more.
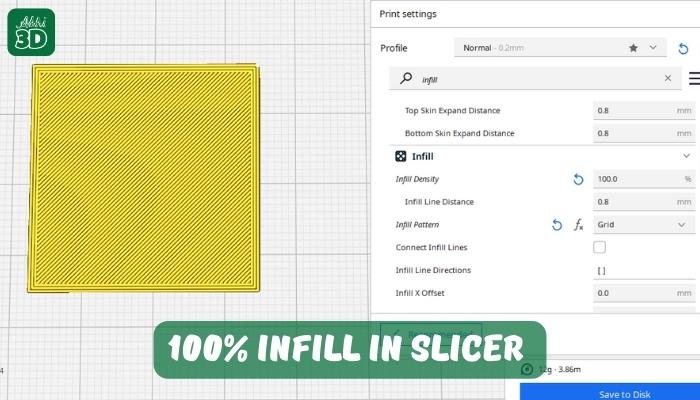
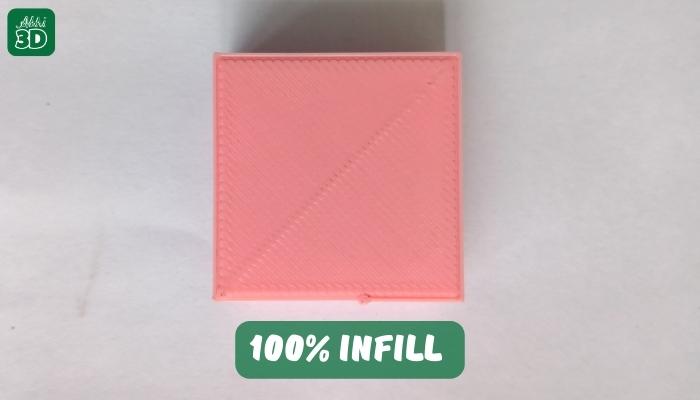
Below is a simple cube I printed with 100% Infill. I stopped printing it after it was 20% complete so you can see its internal structure which is completely solid from the inside. Holding it in my hand, I can tell you it feels real solid object.
Pros:
1. Maximum Strength: Provides the highest structural integrity and durability for printed objects.
2. Enhanced Heat Resistance: Objects with 100% infill are better at withstanding high temperatures.
3. Smooth Surface Finish: Reduces visible layer lines, resulting in a smoother and more aesthetically pleasing surface.
Cons:
- Longer Print Times: Printing with 100% infill takes significantly more time compared to lower infill percentages.
- Increased Material Usage: It consumes more filament, which can be costly.
- Heavier Objects: Printed items are heavier, which may not be desirable in some cases.
For more please check our 100 Infill guide here.
Best Infill For 3D Printing:
The “best” infill pattern depends on the specific requirements of your 3D-printed object. Here are some general guidelines to help you choose:

- Rectilinear or Honeycomb: These patterns are excellent choices for most applications. They strike a good balance between speed, strength, and material usage.
- Triangular: Use triangular infill when you need added strength and rigidity for structural components.
- Gyroid: Gyroid infill is the best choice for objects that require exceptional strength, especially if weight is a critical factor.
Strongest Infill Pattern:
The choice of infill pattern is especially important when strength is a primary concern, as it impacts the object’s structural integrity and durability. Among the various infill patterns available, the Cubic, Honeycomb, Gyroid, Rectilinear and Triangular infill pattern is often regarded as one of the strongest and most efficient options.

Even though all these 5 patterns are quite strong but if we have to choose one then it’s Cubic infill as the winner. You can check infill strength comparison test here to know why it’s the strongest.
For more detail please check our detail strongest infill pattern guide here.
Fastest Infill Pattern:
The print time is a crucial factor in 3D printing and you might be wondering out of all these pattern which is the fastest? Well, we have written a fastest infill pattern guide here. But just for a summary here, Rectilinear or Lines, Concentric, Triangular, Honeycomb and Zig Zag are fast in printing compared to other infill patterns.
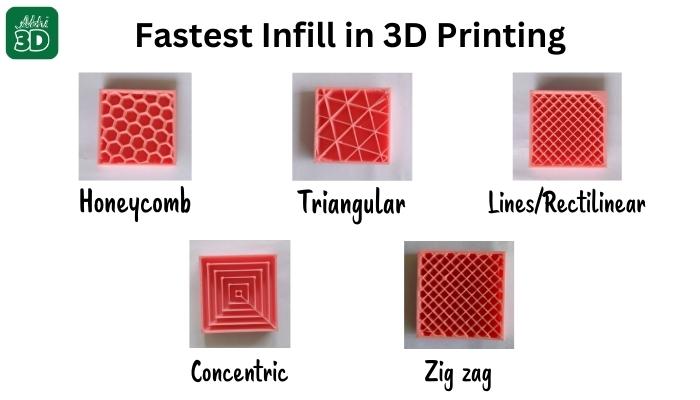
Out of all these patterns, I will recommend you use a Rectilinear or Lines pattern to print quickly. It prints in simple straight lines and faster because it requires fewer movements and changes in direction compared to other patterns.
You can check more details about the fastest infill pattern here
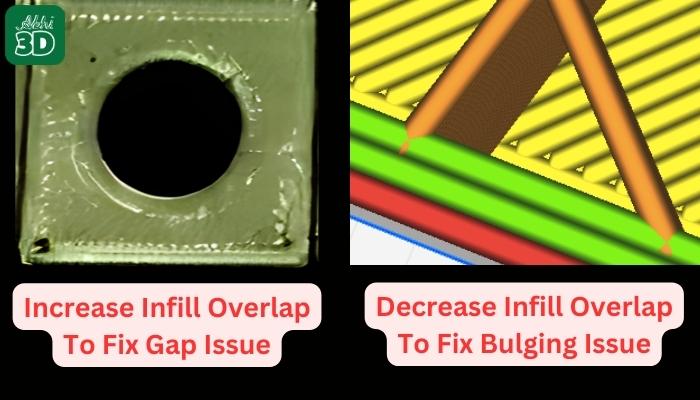
Infill Overlap:
Infill overlap refers to the percentage of overlap between the infill and the outer layers (perimeters or outer shell) of a 3D-printed object. It ensures that the infill and the perimeters are well connected, preventing gaps and improving the object’s strength.
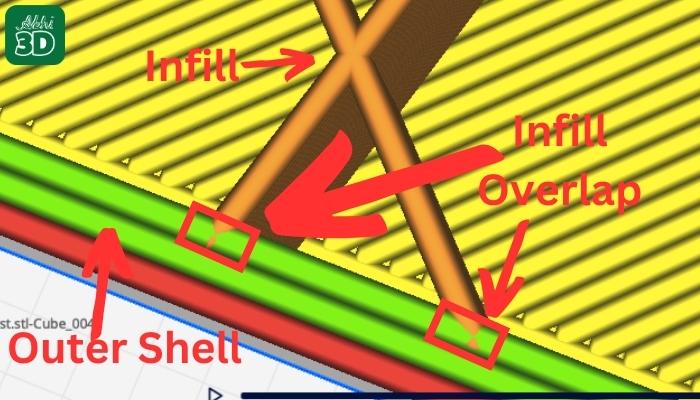
The right infill overlap depends on various factors, including the type of material used, the 3D printer’s precision, and the specific requirements of the printed object. Typically, an infill overlap of 10-30% is recommended.
A higher infill overlap percentage can lead to stronger objects but may also cause over-extrusion, leading to rough surfaces. On the other hand, a lower infill overlap percentage may result in weak bonding between the infill and the perimeters, leading to gaps and potential structural weaknesses.
You can read more about Infill Overlap here in detail.
Infill FAQ:
Let’s look at some frequently asked questions related to infill.
What is Infill?
Infill refers to the material used to fill the interior of a 3D-printed object. It provides structural support and density to the printed item, with commonly used infill patterns being honeycomb or grid. The infill percentage determines the amount of empty space within the object, affecting its strength and print time.
Which Infill pattern is the strongest?
The gyroid infill pattern is often considered one of the strongest infill patterns for 3D printing due to its intricate and uniform lattice structure, providing good strength and weight distribution in printed objects.
Is 10% Infill Enough?
10% infill is good for light and non-stress items. You might want to prefer it for toys, decorative items or some prototype.
Can you 3D Print Without Infill?
Yes, you can 3D print without infill, but it may not be suitable for all objects. It will then become a case of 0 infill.