If you have printed any 3D objects then you must be familiar with G-code files. You must have used some 3D slicer like Cura to generate Gcode file and that file is actually the main file that 3D printer uses to 3D print your objects.
Well in this article we will discuss what that G-code file do in 3D printing. Next we will discuss how G-code files work, steps to create it using 3D slicer like Cura and finally it’s comparison to STL file. We will also answer FAQ related to G-code file.

Table Of Contents
What Is Gcode File For 3D Printing:
First things first, let’s break down what G-Code is. G-Code, or Geometric Code, is the universal language of 3D printers.
A G-Code file is essentially a set of instructions for your 3D printer. It defines every movement, every layer, and every tiny detail of the object you’re printing. It’s like a roadmap, guiding your printer on its journey to create your 3D-printed object.
You can say it’s a magical script that tells your 3D printer exactly what to do, how to do it, and in what order. Think of it as the director of a movie, guiding every move of the actors (or in this case, the printer’s components) to create a masterpiece.

How Does G-Code File Work?
Well, the G-Code file is created by slicing software for 3D printing. This software like Cura takes your 3D model and slices it into hundreds or even thousands of horizontal layers. Each layer is then converted into G-Code instructions. These instructions are what your 3D printer follows to create each layer of your object, building it up layer by layer until your 3D-printed object is complete.

Now, you might be thinking, “That sounds complicated.” But don’t worry, you don’t need to be a coding genius to use G-Code. Most 3D printing slicing software will generate the G-Code file for you. All you need to do is load your 3D model into the software, adjust your settings, let the software slice, and generate the G-code file for you.
When Was G-Code First Used?
The first use of G-Code dates back to the 1950s. It was developed by MIT as part of a project funded by the U.S. Air Force. The goal was to create a “universal” language for programming machine tools, and G-Code was the result. The first CNC machine using G-Code was demonstrated in 1958, and it was a game-changer in the manufacturing industry.

Before G-Code, machine tools were manually operated, which was a time-consuming and labour-intensive process. With G-Code, manufacturers could automate these processes, increasing efficiency and precision. It was a revolutionary development that paved the way for the advanced manufacturing technologies we see today.

Process To Generate G-code File: Steps to Open & Save File Added
G-Code, or Geometric Code, is a programming language that is used to instruct 3D printer machines on how to make precise movements. The language allows these machines to create detailed and accurate prints.
1. Generate G-Code: The first step in the process is to generate the G-code file. To convert your 3D model into G-code, you’ll need to use a process called ‘slicing’. Slicing software takes your 3D model and ‘slices’ it into hundreds or even thousands of horizontal layers.
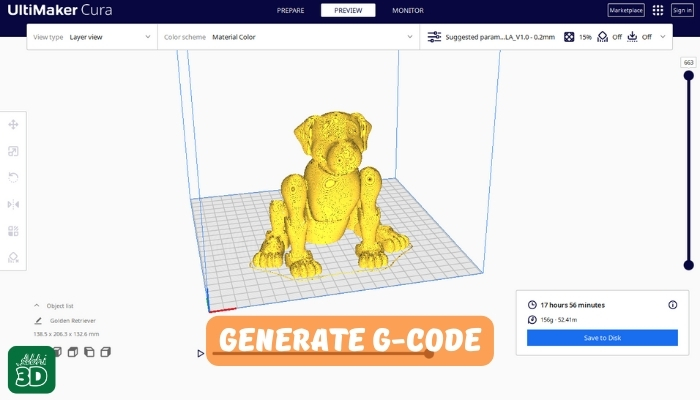
Each layer is then translated into G-code, which tells your 3D printer exactly how to print each layer. Some popular slicing software includes Cura, PrusaSlicer, and Bambu Studio.
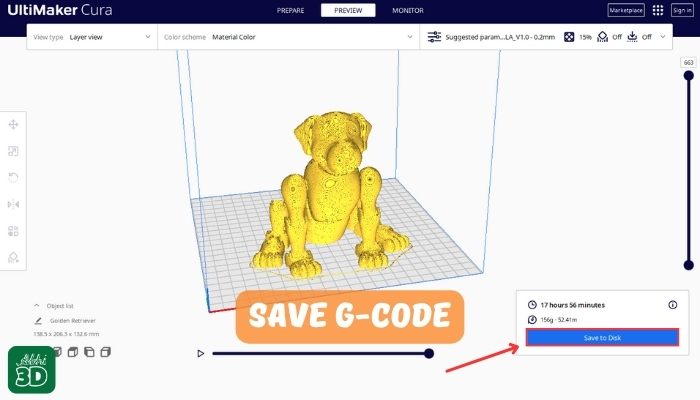
2. Save G-Code: Once you’ve generated your G-code file, the next step is to save it. You’ll need to save your G-code file. This is typically done on a removable storage device like an SD card or a USB stick. Once the file is saved, you can insert the storage device into your 3D printer, select the file, and start the printing process.
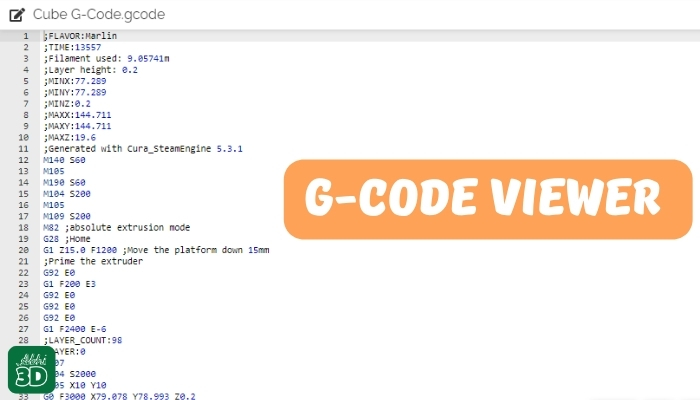
3. View G-Code: Well, there are several G-Code viewers available online, such as NC Viewer, GCode Viewer, and others. These tools allow you to upload your G-Code file and visualize the tool paths. It’s like having a bird’s eye view of your 3D printers movements before it even starts working.
4. Syntax Highlighting: Now, let’s talk about syntax highlighting. If you’ve ever coded, you know how important syntax highlighting is. It’s like the GPS of coding. It guides you through the code, highlighting errors, showing you where you are, and making it easier to navigate through the lines of code.
In the context of G-Code, syntax highlighting can be incredibly useful. It can help you spot errors in your code, understand the structure better, and make the process of writing and debugging G-Code much easier. Many text editors, like Notepad++ or Sublime Text, offer syntax highlighting for G-Code.

5. Convert and Save: Finally, let’s talk about saving. Once you’ve viewed your G-Code, highlighted the syntax, and converted it (if necessary), it’s time to save your work. This is usually as simple as clicking “File” and then “Save” or “Save As” in your text editor or G-Code viewer.

G-Code Vs STL File For 3D Printing:
G-Code and STL files are both important files required for the process of 3D printing. However, they serve different purposes and are used in different stages of these processes. Let’s understand them by comparing G-code to STL.

| G-Code | STL File |
|---|---|
| 1. File Purpose: G-Code, or Gerber Code, is the language that 3D printers use to create physical objects. | 1. File Purpose: STL file is like a blueprint, while G-Code is like the step-by-step instructions used to build the house. The STL file will show you what the finished product should look like, but it won’t tell you how to get there. That’s where the G-Code comes in. |
| 2. File Creation: G-Code is created using CAM (Computer Aided Manufacturing) software, which takes a CAD (Computer Aided Design) design and translates it into machine language. Ex- Cura, PrusaSlicer etc. | 2. File Creation: STL files are created using CAD software, which allows the user to design the 3D model. Ex- Blender, Maya, Fusion 360 etc. |
| 3. Level of detail: G-Code can control every aspect of the printing process, including the speed of the print head, the temperature of the print bed, and the amount of filament used. | 3. Level of detail: STL files are limited to surface data or you can say the geometry of an object and cannot represent colour, texture, or internal structure. |
| 4. File Editing: G-Code files can be manually edited if you understand the code, allowing for fine-tuning of the machine instructions. | 4. File Editing: STL files can be edited using CAD software, but changes are typically made to the model design rather than the printing instructions. |
| 5. Machine Compatibility: G-Code is universally accepted by 3D printers. | 5. Machine Compatibility: STL files, however, need to be converted into G-Code before they can be used by a 3D printer for printing. |
G-Code FAQ(Frequently Asked Question):

Let’s find out answer to some common questions about G-Code files.
G-Code format is a type of programming language that is used to instruct 3D printers on how to perform certain tasks to print the 3D object. It is a series of commands that guide the machine’s movements, speed, and other operational aspects. Each line of G-Code corresponds to a specific action for the machine to execute. This format is widely used not only in 3D printing but also in milling, and laser cutting.
1. Check the Syntax: You must ensure that the G-Code syntax is correct. Any errors in the syntax can cause the machine to misinterpret the instructions.2. Verify the Coordinates: Next, make sure the coordinates in the G-Code match with the actual dimensions of the machine.
3. Test Run: Now perform a test run without any material. This can help identify any potential issues without causing damage.
4. Use a Simulator: There are G-Code simulators available that can help identify any potential errors in the code.
5. Consult the Manual: If all else fails, consult the manual or reach out to the manufacturer for assistance.
Conclusion:
In the end I can say, G-Code files are the lifeblood of 3D printing, serving as the essential blueprint for every 3D print job. They are the language that 3D printers understand, translating your 3D model into a series of precise movements and operations for the printer to execute.
Another great thing about G-Code file is its universality – regardless of the 3D printer you’re using, G-Code is the common language that every 3D printer understand and use it create your 3D model design.