Blender is an open-source 3D modeling software that opens up a world of possibilities for 3D creation.
If you’re a professional or a beginner in the world of 3D printing, you may have used Blender at some point in your life. Using it you can create 3D models, do rigging, create animations, and simulations.
Blender isn’t just about creating your own 3D models. It’s much more than that. In Blender, you can manipulate 3D models, whether they’re your own created models or imported from other software like Fusion 360, Onshape, Tinkercad, or SolidWorks. By importing them in a blender you can make changes in them. it is user-friendly, and it’s ready to help you bring your 3D visions to life.
As our website is all about 3D printing and STL is the most popular format for 3D printing. So here we decided to share all the steps to open STL file in blender.
Before we begin if you are new to STL and why it’s the most popular file format in 3D printing. Please read our detailed guide on STL file here.
Just to make sure we are on the same page here are some important details you must know about the STL file.
STL file is used for 3D printing because it describes the surface geometry of a 3D object without any representation of colour, texture, or other common CAD model attributes. It’s generally smaller and simpler to handle than an OBJ or 3MF file, which is why this become one of the most used file formats in 3D printing.

Now let’s talk about how you can import STL file in Blender.
Table Of Contents
Check the Units(Mostly in Metric for 3D Printing) In Blender:
Before you bring your STL file into Blender, check the units used to make the STL and make sure they are the same as the units in your Blender scene. This makes sure your STL file is the right size compared to any other models you already have in your scene.
Here it’s important to note metric unit system is usually preferred for 3D printing so that’s what I will recommend you set in your Blender.
To do this in blender, just go to the “Scene Properties” tab on the right-hand side of the screen. You will see an icon that looks like a little cone.
Then in the “Scene Properties” tab, you’ll see a section labelled “Units”. Here, you can choose the measurement system you want to use. Blender supports both Metric and Imperial systems.
In the metric system, you can choose meter, centimeter etc while in the imperial system you will find feet, inches, etc. Here I will recommend you to go with a metric system and choose a unit based on your preference.

Below the measurement system, you’ll see an option for “Unit Scale”. This is where you can set the scale of your units. For example, if you’re working with a small object, you might want to set the unit scale to 0.001. If you’re working with a large object, you might want to set it to 1.0 or higher.
Now that you’ve set up your units, you can verify them by creating a simple object in Blender. For example, you could create a cube and then check its dimensions in the “Object Properties” tab. This tab is represented by an icon that looks like a square with vertices.

It’s important to verify units before importing an STL file to ensure that the scale of the objects in your scene is correct. If the units are not verified, it could lead to issues with the scale of your objects, which could affect the final result of your project.
Steps to Import or Open the STL file in Blender:
In the latest version of Blender, there are 2 methods for importing STL file. The first one is the STL add-on and the other one is the STL (experimental) method. STL (experimental) method imports STL files much faster than the STL add-on. Although STL add-on is still available in the Blender.
Let’s see the steps for both ways.
The STL Add-On:
In the Blender new version, the STL add-on comes pre-enabled but if you are unable to find this feature, you need to follow these steps:
1. Open Blender on your computer.
2. Go to “Edit” and then select “Preferences”.

3. In the Preferences window, click on the “Add-ons” tab.
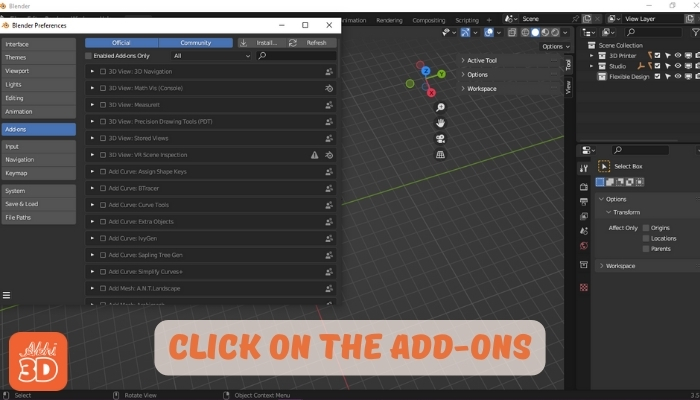
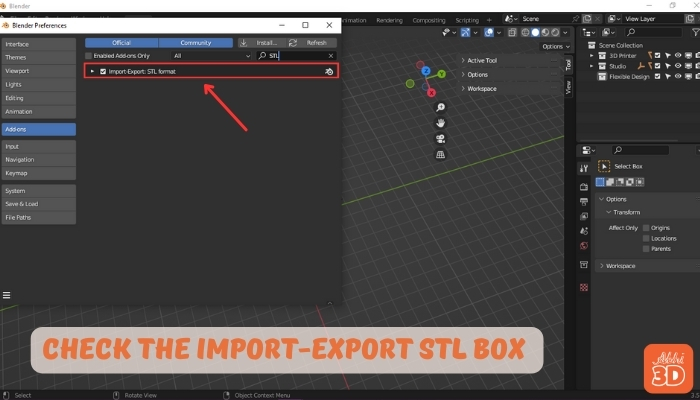
4. In the search bar, type “STL” to find the STL format add-on.
5. Once you see the “Import-Export: STL format” add-on, check the box to the right of it to enable the add-on.
6. Close the Preferences window. Now, you should be able to import and export STL files.
Now you can import your STL file using STL add-on feature.
To import an STL file follow below steps:
1. Go to “File” in the top menu.

2. Select “Import” from the dropdown menu.
3. Choose “Stl (.stl)”.

4. Navigate to the location of your STL file, select it, and click “Import STL”.

Remember, the STL add-on must be enabled every time you want to import or export STL files.
The STL (Experimental) Method: Steps To Import STL Using 2nd Method
The STL Experimental feature in Blender is faster than the add-on, provides better error handling, and improves performance. It allows for more complex and detailed models and is more efficient in terms of memory usage compared to the STL addon.
1. Go to “File” in the top menu.
2. Select “Import” from the dropdown menu.
3. Choose “Stl (.stl) (experimental)”.
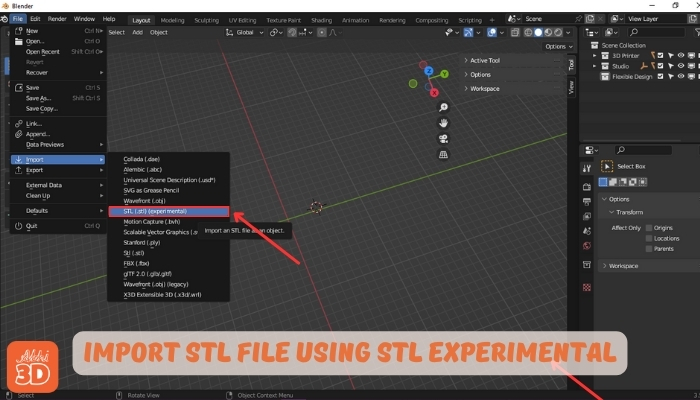
4. Navigate to the location of your STL file, select it, and click “Import STL”.
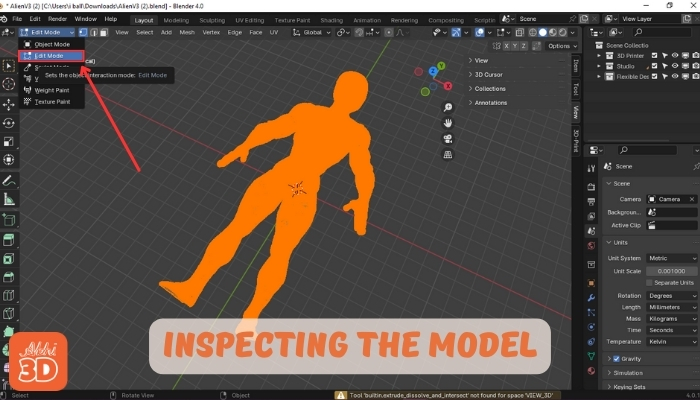
Inspecting the 3D Model In Blender:
After importing an STL file in Blender using the STL Experimental feature, you can inspect the model by navigating to the “Object Mode” and selecting your model. You can rotate the view or zoom in and out to check the model from different angles. For a more detailed inspection, use the “Edit Mode” to see individual vertices, edges, and faces. You can also use the “Mesh Analysis” tool to check for any errors or inconsistencies in the model.
Below you can see I am editing our Alien STL file in Blender. Very soon I will add the STL file for you too here.
Centering the 3D Model In Blender:
Here’s a step-by-step process on how to center a 3D model in Blender:
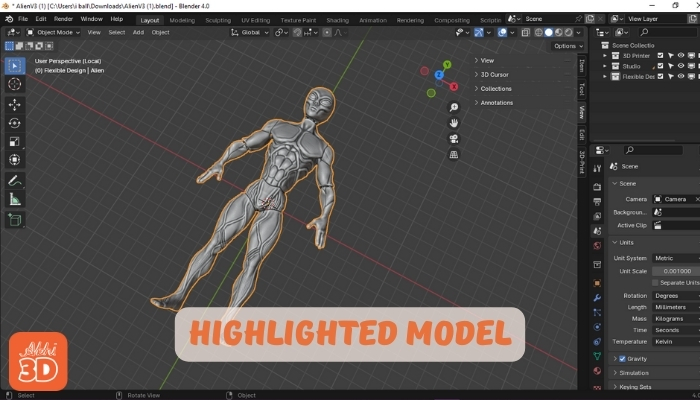
1. Once your model is imported, click on it to select it. The model should be highlighted, indicating it’s selected.
2. Press the “N” key to open the “Transform” panel on the right side of the 3D view. This panel shows the location, rotation, and scale of the selected object.
3. In the “Location” section of the “Transform” panel, you’ll see three values: X, Y, and Z. These values represent the position of the model in 3D space. To center the model, set all three values to 0. You can do this by clicking on each value and typing “0”, then pressing “Enter”.

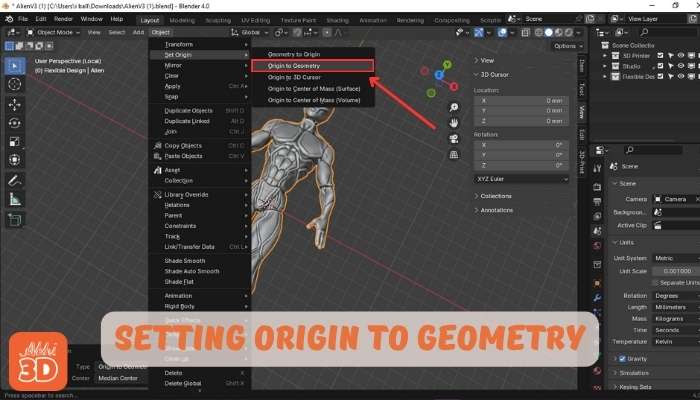
5. Then, click on “Object” in the bottom menu, go to “Set Origin”, and select “Origin to Geometry”. This will move the model’s origin to the center of the model.
4. Next, press “Shift + S” and select “Cursor to Selected” from the drop-down menu. This will move the 3D cursor to the center of the object.

6. Finally, press “Ctrl + A” and select “Location”. This will apply the new location to the model, making it the new default position
And that’s it! Your model should now be centered in Blender. Remember to save your work by clicking on “File” and then “Save”.
In the future, I will add more articles related to Blender. So stay tuned.
In the comments let us know for what purpose you are using Blender. If you have any questions, please ask in the comment below.