Bed Leveling is the most important thing to learn if you are new to 3D printing or just bought your first 3D printer. It is important to note, only if you level print bed perfectly you will get good quality prints.

Here in this complete guide I will show you how you can level your bed to get perfect first layer and test it to make sure your 3D print are of good quality.
Table Of Contents
- Understanding Basics Of Bed Leveling:
- 3D Printer Bed Leveling Tools:
- G-Code Files To Test Bed Leveling:
- STL File To Test Bed Leveling:
- Manual Bed Leveling in 3D Printing:
- Auto Bed Leveling in 3D Printing:
- Using Z Offset To Level Bed Perfectly:
- When Should You Adjust The Bed Leveling?
- How Important Is Bed Leveling?
- FAQ Related To Bed Leveling in 3D Printer:
Understanding Basics Of Bed Leveling:
Bed Leveling is not just about getting perfect tiny gap between nozzle and print bed, it also include this perfect gap should remain same no matter where that nozzle is positioned while printing. So when doing bed leveling you just need to get 2 things right:
1. Getting the perfect tiny gap between nozzle and print bed

2. Making sure that this perfect gap remains constant when nozzle is moving across the print bed at the time of printing
3D Printer Bed Leveling Tools:
Achieving a properly leveled bed is essential for successful 3D printing. To ensure that the first layer adheres uniformly to the print surface and that your subsequent layers are precise and accurate, you’ll need a set of bed leveling tools. Here let’s explore some of the most commonly used bed leveling tools and their functions.
Paper or Cardstock: A simple sheet of paper or thin cardstock, is often placed between the nozzle and the bed. You level the bed by adjusting the screws or knobs at the corners of the bed until there’s a slight friction when moving the paper under the nozzle.

G-Code Files to Test Bed Leveling: In order to verify the proper movement of the printing nozzle across the entire print surface during your initial 3D printing test, you’ll require specific G-Code files. In the upcoming section of this article, we’ll furnish you with downloadable G-Code files. You can use these files for printing and to confirm the level of your 3D printer’s bed.

Automatic Bed Leveling Sensor(Optional): Many 3D printers come with firmware or software that supports automatic bed leveling. This software guides the printer through the leveling process, automatically adjusting the nozzle’s height based on feedback from the leveling sensor.

Z Offset Settings – Understanding Z Offset settings is important for achieving the ideal minimal distance between the nozzle and the print bed. Later in this post, you will find complete instructions on how to implement Z Offset to ensure that your 3D printer bed is properly leveled.

G-Code Files To Test Bed Leveling:
I’ve made two special files (G-Code files) that you can use to check if your 3D printer’s bed is level. One file prints a cube in the middle and each corner of the bed to ensure it’s flat and even. This helps make sure your prints stick well and come out nicely.
Download Cube G-Code Files Here
If your bed is leveled nicely, you will see the result like we tested below.

The second G-Code file has a curved corner with two holes in it. If you can only choose one from the two files we’re giving you, go with this one. The reason is that if your 3D printer’s bed isn’t level, it will struggle to make curved corners and empty holes.
Download Curve Corners With 2 Holes G-Code Files Here
If your bed is leveled nicely, you will see the result like below when we tested it.

Note: I set Z offset to get my bed leveled properly. The details about it is shared later in this post.
STL File To Test Bed Leveling:
If you are looking for STL file to test the first layer, I got you covered. You can download STL file of above G-Code files below. You can download it instantly, slice it yourself according to your settings and 3D print it.
File 1:
Download STL File Of Cube To Test Bed Leveling
File 2:
Download STL File Of Curve Corner With Holes To Test Bed Leveling
Manual Bed Leveling in 3D Printing:
Bed leveling is a fundamental aspect of 3D printing that significantly impacts the quality and success of your prints. Manual bed leveling is the process of adjusting the position of the 3D printer’s build platform or print bed to ensure that it is perfectly parallel to the printer’s nozzle or hot end. This alignment is essential for proper adhesion of the first print layer and the overall accuracy of subsequent layers. Here’s a comprehensive guide to manual bed leveling in 3D printing.

Why Manual Bed Leveling?
Manual bed leveling is commonly used in 3D printing because it’s a straightforward, cost-effective method that works with various 3D printer models. Unlike automatic bed leveling, which relies on sensors to make adjustments, manual bed leveling involves personal judgment and direct control by the user.
How to Manually Level the Bed:
Below are the simple 5 steps to manually level the print bed.
Step 1 – Move the nozzle to one corner and close to print bed, usually the front-left.

Step 2 – Place the paper on your print bed under the nozzle.

Step 3 – Adjust the bed screw until you feel slight friction when moving the paper. The paper should be trapped between the nozzle and bed but still move with some resistance.

Step 4 – Repeat this process for each corner of the bed. Make sure the nozzle is at the same height above the bed at all four corners.
Step 5 – Bed leveling can be an iterative process. After leveling all corners and the center, it’s common to revisit each corner to ensure they are still level and make any necessary minor adjustments.
Once you are satisfied with the bed leveling, then run a test print to ensure that the first layer adheres evenly to the bed.
Auto Bed Leveling in 3D Printing:
Auto bed leveling (ABL) is a crucial feature in 3D printing that helps ensure a successful and accurate print by compensating for any unevenness or imperfections in the build surface, typically the print bed. The primary purpose of auto bed leveling is to make sure that the first layer of your 3D print adheres uniformly to the build surface, which is essential for proper adhesion and print quality.
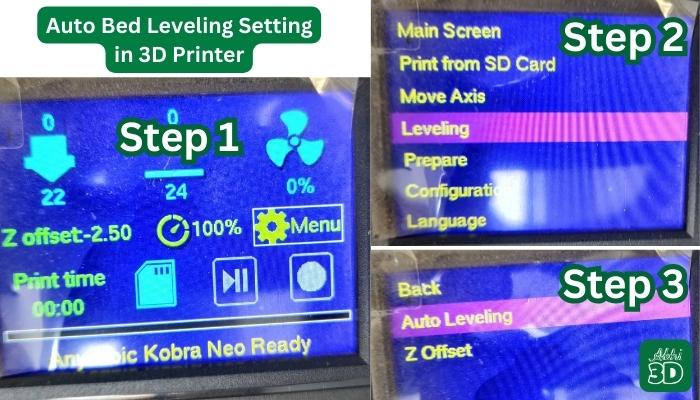
How to Auto Level the Bed:
Auto bed leveling is a convenient feature in 3D printing, but it typically requires manual setup and calibration to work correctly. Here are the general steps to auto-bed level your 3D printer’s bed:
1. Mount the Auto Bed Leveling Sensor: If your 3D printer doesn’t already have an auto bed leveling sensor installed, you will need to mount one. The sensor is typically attached to the print head or another suitable location, depending on your printer’s design. Consult your 3D printer’s manual for specific instructions on sensor installation.

2. Install or Update Firmware: Most auto bed leveling systems require specific firmware to function properly. You’ll need to install or update your 3D printer’s firmware to enable auto bed leveling. This step can vary depending on your printer’s make and model, so consult the manufacturer’s documentation or online resources for guidance on firmware installation and configuration.
3. Level the Build Plate: Before enabling auto bed leveling, it’s essential to manually level your build plate as closely as possible. This means adjusting the bed’s corner screws or leveling knobs to ensure that it is reasonably level. Use a piece of paper or a feeler gauge to gauge the distance between the nozzle and the bed. Make sure the nozzle is close enough to the bed but not touching it.
4. Enable Auto Bed Leveling in Firmware: Access your 3D printer’s firmware settings, either through a graphical user interface (GUI) or via a terminal if it’s a Marlin-based system. Look for options related to auto bed leveling and enable them. These settings may include selecting the type of auto bed leveling sensor you’re using (inductive, capacitive, etc.), as well as defining the number of probing points and probing speed. Follow the specific instructions for your printer and firmware version.
5. Calibration and Probe Points: After enabling auto bed leveling, you will need to perform a calibration process. This typically involves the printer probing the bed at several predefined points to create a height map of the bed’s surface. The exact calibration process will depend on your printer’s firmware. Some printers may guide you through this process step by step.
6. Save Settings: Once the calibration is complete, save the settings to the printer’s memory or in the firmware configuration. This ensures that the printer will use the height map data for future prints.
7. Test Prints: Conduct test prints to ensure that the auto bed leveling is functioning correctly. You should notice improved first-layer adhesion and print quality. It is important to note after auto bed leveling you will still need to set up your Z offset correctly.
Remember that the specific steps and settings for auto bed leveling may vary depending on your 3D printer, as well as the firmware it uses. Always refer to your printer’s documentation.
Using Z Offset To Level Bed Perfectly:
Z Offset is a crucial parameter in 3D printing that determines the distance between the nozzle of the 3D printer and the print bed.

Getting the Z Offset right is essential for achieving a successful and accurate 3D print. Let’s explore how to set Z Offset in different scenarios:
Nozzle Too High from Print Bed:
When the nozzle is too high from the print bed, it means there’s too much space between the nozzle and the bed. In this case, your 3D printer won’t be able to properly adhere to the print bed, leading to issues like poor bed adhesion and a lack of print detail.
To fix this, you need to decrease the Z Offset value. Reducing the Z Offset will move the nozzle closer to the print bed. You can do this incrementally until you achieve the right distance. It’s important to make small adjustments and monitor the print progress to avoid collisions between the nozzle and the bed.

Nozzle Close to the Print Bed:
When the nozzle is very close to the print bed, it can cause problems like scraping or gouging the bed surface, leading to damage or misalignment. It may also result in over-extrusion, where filament is squished out excessively, leading to a messy print.
To rectify this situation, you’ll want to increase the Z Offset value. This will raise the nozzle slightly above the print bed, providing just enough space for proper layer adhesion. As with lowering the Z Offset, adjust the value in small increments to find the perfect balance.

Nozzle and Print Bed at Suitable Distance:
When the nozzle and the print bed are at the right distance, you’ll achieve optimal bed adhesion and high-quality 3D prints. The right Z Offset value ensures that the first layer adheres well to the bed without any issues.

Achieving this ideal Z Offset value might require some trial and error, especially with different filament types or print bed surfaces. Start with manufacturer recommendations for your printer and filament, and then make minor adjustments if needed.
NOTE: Remember that the Z Offset is typically set as a negative value (e.g., -0.1mm, -0.2mm, etc.) when decreasing the distance between the nozzle and the bed and as a positive value (e.g., +0.1mm, +0.2mm, etc.) when increasing the distance. One of our 3D printer has Z Offset value set to -2.50mm. So don’t be afraid if the number increase to high value.
When Should You Adjust The Bed Leveling?
Proper bed leveling is a critical factor in achieving successful 3D prints. The level of the print bed ensures that the first layer adheres correctly to the build surface and sets the stage for accurate layering throughout the printing process. Knowing when to adjust bed leveling in a 3D printer is essential to maintaining print quality and reliability. Here are some key considerations:

- Initial Setup: Level the bed during the printer’s initial assembly.
- After Transport: Recheck and adjust bed leveling after moving the printer.
- Regular Maintenance: Periodically maintain bed leveling for consistent print quality.
- Signs of Poor Adhesion: If prints don’t stick or appear uneven, relevel the bed.
- Changes in Build Surface: Adjust bed leveling when switching build surface materials.
- Unusual Noises: Address bed leveling if unusual printing noises occur.
- Uneven Extrusion: Correct bed leveling if extrusion is inconsistent on the first layer.
- Temperature Variations: Temperature changes can affect bed level; relevel when needed.
How Important Is Bed Leveling?
Proper bed leveling ensures uniform adhesion of the first print layer, preventing issues like nozzle jams and warping, thus enhancing print quality and preventing failures. It is vital for achieving accuracy, precision, and the ability to select smaller layer heights, particularly important for intricate designs. Additionally, it aids in maintaining consistent extrusion and material flow, resulting in efficient and cost-effective printing.
FAQ Related To Bed Leveling in 3D Printer:
Here let’s look at some frequently asked questions and answers related to bed leveling.

Why Achieving 100% Perfect Bed Leveling Is Very Difficult?
Achieving 100% perfect bed leveling in 3D printing is very difficult due to various factors such as uneven surfaces, variations in build plate materials, and minor imperfections in the printer itself. Additionally, temperature changes and material properties can further impact bed adhesion, making it challenging to maintain a flawless level throughout a print.
What is Auto Bed Leveling?
Auto bed leveling is a feature in 3D printing where sensors or probes attached to the printer automatically adjust the print bed’s position to ensure it’s level and at the correct distance from the print nozzle. This helps improve print quality and eliminates the need for manual bed leveling, saving time and effort.
Which 3D Printer Has Auto Bed Leveling?
Many 3D printers offer auto bed leveling as a standard feature or as an upgrade option. Some popular brands and models with auto bed leveling capabilities include the Prusa i3 MK3, Creality Ender 3 V2, and Anycubic i3 Mega. However, the availability of auto bed leveling can vary, so it’s essential to check the specifications of specific printer models to confirm this feature.
How Thick Is Bed Leveling Paper Should You Use?
When using manual bed leveling, a common guideline is to use a standard sheet of paper, which is typically about 0.1 millimeters (0.004 inches) thick. This thickness allows for a slight gap between the print nozzle and the bed, ensuring proper adhesion without being too close.