A raft is a type of build plate adhesion used in 3D printing, where a layer of plastic is printed underneath your object, allowing the object to be printed directly onto more plastic. After the print is complete, the raft is removed.
Raft helps with adhesion to the build plate, reduces warping, and can improve the quality of the print, especially for objects with a small footprint or those with complex geometries.
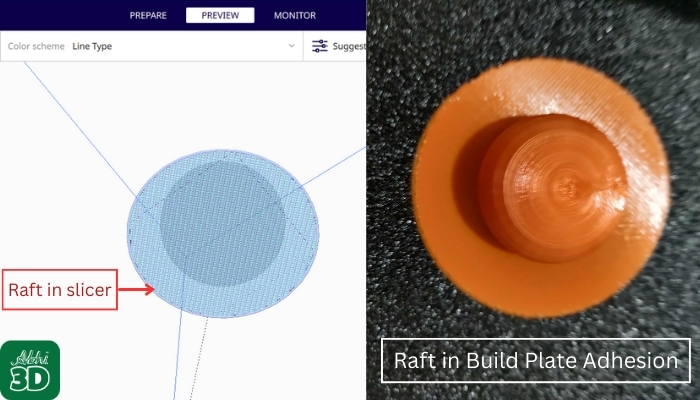
In the above example, you can see I printed a sphere onto the raft. You can see a thick horizontal latticework filament that is printed first, onto which our sphere is printed. The raft size is larger than the print and acts as a foundation, helping with adhesion and reducing warping.
Raft are primarily used with ABS to help with warping and bed adhesion, but they can also be used to help models with small footprints or to create a strong foundation for the upper layers of your 3D object part.
Table Of Contents
Enable Raft Settings In Cura:
If you want to enable raft settings in Cura, you need to follow below steps:
1. Open the 3D printing software and click on the “Build Plate Adhesion” tab.

2. Select “Raft” from the first dropdown menu labeled “Build Plate Adhesion Type”.

3. Adjust the raft settings, such as the number of base layers, raft offset from the part, and separation distance, to ensure a strong adhesion and a smooth surface.
Customising Raft Print Setting in Cura:
You can customize the Raft setting by going to the build plate adhesion type. Here I will explain each of these raft settings available.

Here are custom Raft settings in Cura:
1. Raft Extra Margin:
This setting controls the extra space around the object where the raft is printed. A larger margin can help ensure the object stays attached to the raft, but it also uses more filament.

2. Raft Air Gap:
This is the distance between the top of the raft and the bottom of the print. A larger air gap can make the raft easier to remove, but if it’s too large, the print might not stick to the raft properly.

3. Raft Top Layers:
This setting controls the number of dense layers at the top of the raft. More layers can make the raft stronger and provide a smoother surface for the print, but they also use more filament.

4. Raft Base Thickness:
This is the thickness of the first layer of the raft. A thicker base layer can help the raft stick to the build plate, but it also uses more filament.

Raft Vs Brim:
Rafts and brim are both techniques used in 3D printing to improve adhesion to the build plate. The main difference between them is that rafts go underneath the printed object, while brim go around the printed object.
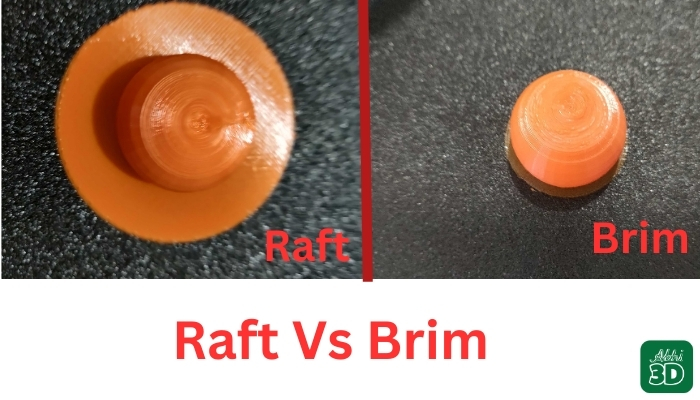
Rafts take more filament and add more print time than a skirt or brim. On the other hand, Brim extends from the edges of the 3D printed part, effectively giving it a greater surface area to adhere to the print bed. The brim is faster to print and uses less filament than rafts.
Benefits of Using Raft in Build Plate Adhesion:
Raft as we already discussed provides a larger surface area for the print to adhere, reducing the chances of warping. It can improve the quality of the print, especially the bottom layer, as it provides a smooth and level surface for the print to build upon. Let’s look at all the benefits you will get If you enable raft settings for your 3D prints.
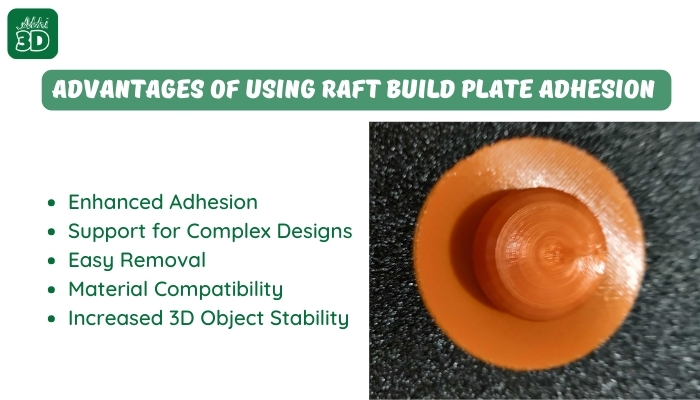
1. Improved Adhesion: Rafts provide a larger surface area for the print to adhere to, reducing the chances of warping or detachment from the build plate.
2. Better Print Quality: By creating a flat and level surface, rafts can help improve the quality of the print, especially for objects with a small footprint or uneven bottom layers.
3. Easy Removal: Rafts can make it easier to remove the printed object from the build plate, reducing the risk of damage.
4. Absorbs Irregularities: If the build plate is not perfectly level or has some irregularities, a raft can absorb these and still provide a flat surface for the print.
5. Support for Complex Prints: For complex prints with overhangs or intricate details at the base, a raft can provide additional support.
Raft Frequently Asked Question(FAQ):
Let’s check a few questions asked related to Raft build plate adhesion.

FAQ 1: What is Raft in Build Plate Adhesion?
Raft essentially creates a flat layer that is printed before the actual object, offering a larger area for the print to stick to. This method can help in avoiding problems such as warping that may arise during the printing process.
FAQ 2: What is Raft Thickness in Build Plate Adhesion?
The raft thickness refers to the vertical dimension of the raft structure, which is the first few layers of material printed underneath the object being printed. You can customize this thickness setting in your 3D printing slicing software. Always remember the thickness of the raft’s bottom layer is greater than the middle layers and the top layer.