The cooling system in the FDM 3D printer is a silent feature, working behind the scenes to ensure the quality and precision of each print. It is a complex mechanism that requires a delicate balance. Too much cooling, and the print could become brittle and weak. Too little, and the print could warp or lose its shape.
This article will explain how to get the best fan cooling setting for your 3D prints. We will also share the cooling fan recommended settings based on the type of filament material you are using to 3D print.
Now, let’s start with understanding cooling settings in Cura or any other 3D slicer.
Table Of Contents
What is Cooling in Cura 3D Printing?
In Cura 3D printing, cooling ensures each layer of your print has enough time to solidify before the next one is laid down. It’s the invisible hand that guides the plastic from a molten state to a solid form, maintaining the integrity of your design. Without proper cooling, the heat from the extruder can cause the layers to warp or deform, leading to a less-than-perfect print.

How Does Cooling Affect 3D Printing?
The cooling settings in FDM 3D printer allow the user to control the fan speed, layer cooling time, and even the minimum speed at which the print head moves, all in a bid to ensure optimal cooling.
So, how does cooling affect Cura 3D printing?
It’s simple.
Too much heat will cause the print to warp or sag, losing its intended form. Too little, and the layers may not adhere properly, leading to a weak structure. This is where cooling ensures to have a perfect balance of heat when you are 3D printing.

In other words, perfect cooling settings will ensure a sturdy, accurate model and not a warped, distorted mess.
Next, let’s see the cooling setting in cura 3D printing slicing software.
Cooling Setting in Cura 3D Printing:
The cooling setting ensures your prints come out looking their best. That prevents warping, curling, and other print defects.
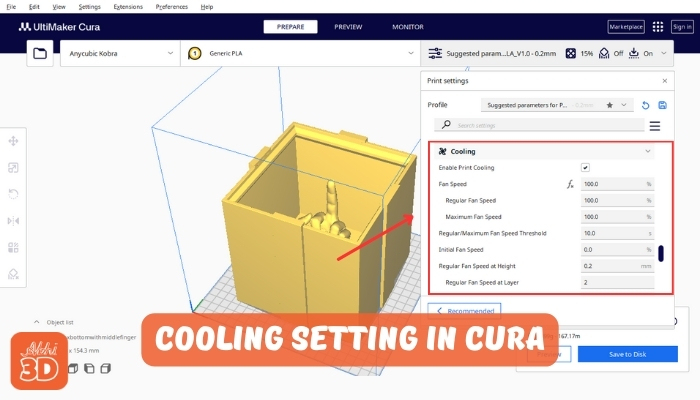
1. Fan Speed:
The first setting you’ll see is ‘Fan Speed’. This controls how fast the fan spins, and thus, how much cooling is provided. A higher speed means more cooling, but be careful not to set it too high, as this can cause other issues.

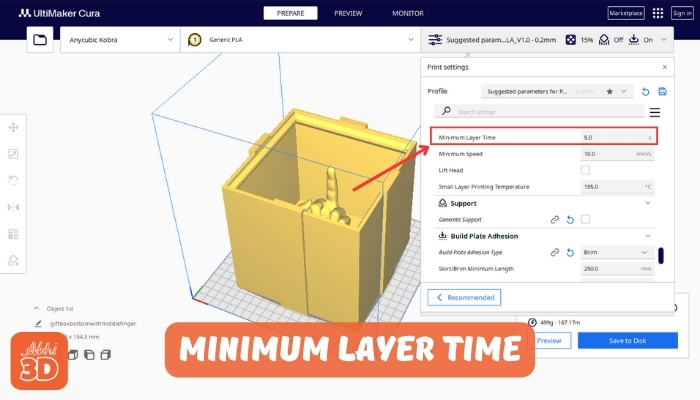
2. Minimum Layer Time:
You’ll see ‘Minimum Layer Time’. This setting ensures that each layer has enough time to cool before the next one is printed. If a layer is printed too quickly, it may not cool properly, leading to print defects.
3. Tweaking the Regular Fan Speed at Height:
The ‘Regular Fan Speed at Height’ setting allows you to control when the fan reaches its regular speed. This is useful for prints with tall, thin sections, as it ensures they are cooled properly.

4. Tweaking the Regular Fan Speed at Layer:
Tweaking the regular fan speed at layer is about finding that sweet spot where the fan speed is just right, not too fast to cause warping, and not too slow to allow overheating. It’s a delicate balance between the machine and the printing material, it can make or break the final product.

5. Regular Fan Speed:
Regular Fan Speed in Cura refers to the speed at which the cooling fan operates during the printing process. This is typically measured in percentages, with 100% being the maximum speed. The fan’s primary function is to cool the extruded filament quickly to ensure it solidifies at the right moment, which is essential for overhangs and bridges.

6. Maximum Fan Speed:
The fan speed in Cura can be adjusted from 0% to 100%, with 100% being the maximum. This percentage represents the speed at which the fan operates. For instance, at 100%, the fan is running at its maximum speed.
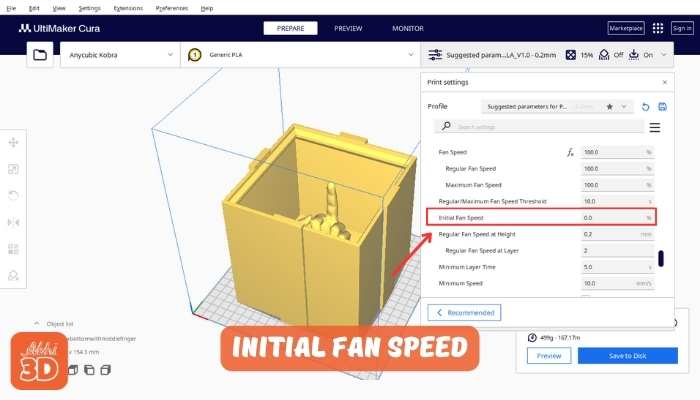
7. Initial Fan Speed:
The first few layers (the number can be set in Cura) often have a different fan speed setting, known as the “Initial Fan Speed”. This is typically set lower to ensure better adhesion to the build plate.
8. Minimum Layer Speed:
The minimum layer speed, setting is used to ensure that each layer has enough time to cool and solidify before the next layer is added. In Cura, you can set a minimum layer time, which will slow down the print speed if a layer would otherwise be printed too quickly. This can be particularly useful for small parts or details, where each layer might not take very long to print. The exact setting can depend on your printer and filament.

9. Lift Head:
“Lift Head” feature in Cura is a setting that can be quite useful, especially when dealing with models that have overhangs or bridges. When the “Lift Head” option is enabled, the print head lifts up slightly when it moves between different parts of the print. This can help to prevent stringing and oozing, as it reduces the chance of the nozzle dragging across already printed parts.

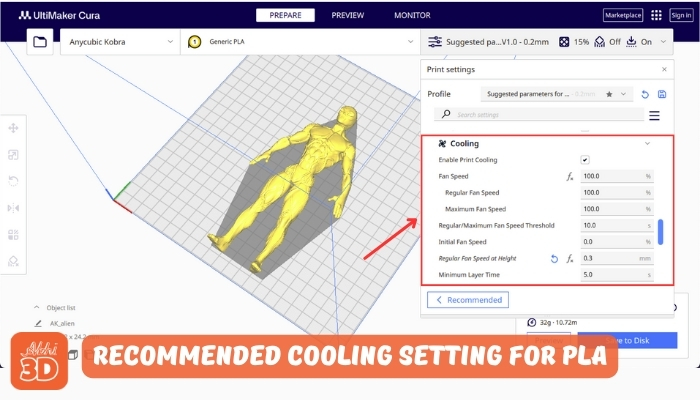
PLA Cooling Setting in Cura:
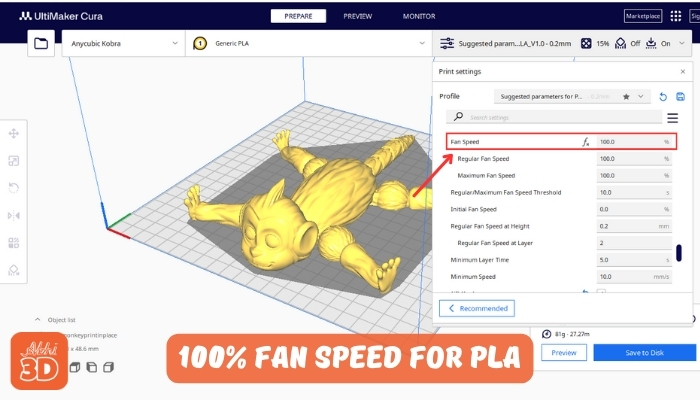
The optimal cooling settings for PLA in Cura can vary depending on the specific model you’re printing and your printer’s capabilities. However, a good starting point is to set the fan speed at 100% after the first few layers. This helps to cool the PLA quickly, preventing warping and improving the overall print quality.
But remember, it’s not just about setting the fan speed and forgetting about it. It would be best if you also considered the minimum layer time. This is the minimum time that the printer will spend printing each layer. If a layer is printed too quickly, it may not have enough time to cool properly, leading to poor print quality. A good starting point for the minimum layer time is around 5 seconds.
Regular Fan Speed at Height, This setting determines at what layer height the fan should reach its regular speed. A good starting point is at the 0.3mm layer height.
Lastly, don’t forget about the initial fan speed. This is the fan speed for the first few layers of your print. It’s generally recommended to keep this lower, around 0-20%, to ensure proper bed adhesion.
ABS Cooling Setting in Cura:
The optimal cooling settings for ABS in cura are generally to keep the fan speed low or even turned off. This is because ABS tends to warp and crack if it cools too quickly. A fan speed of around 20-30% is often recommended, but this can vary depending on the specific model you’re printing and your printer’s capabilities.
A good starting point for Regular Fan Speed at Height is at the 0.5 mm layer height.
However, it’s not just about the fan speed. The print speed and layer cooling time also play a significant role. A slower print speed allows the ABS to cool more gradually, reducing the risk of warping. Similarly, increasing the minimum layer time can give each layer more time to cool before the next one is added. A good minimum layer time is around 10 seconds.

PETG Cooling Setting in Cura:
In Cura, the optimal cooling settings for PETG can vary depending on your specific printer and filament brand. However, a good starting point is to set the fan speed at 0% for the first two layers. This allows the filament to adhere better to the print bed. After that, gradually increase the fan speed to about 40-50%. This helps to cool the filament just enough to prevent stringing and warping, but not so much that it causes the layers to separate.
A good minimum layer time is around 5 seconds and Regular Fan Speed at Height is at the 0.3 mm layer height.

Nylon Cooling Setting in Cura:
Firstly, it’s important to understand that Nylon is a high-temperature filament, which means it requires a higher temperature to print effectively. However, this doesn’t mean you should completely turn off your cooling fan. A moderate cooling setting can help prevent warping and improve the overall print quality.
For Nylon filament, setting the fan speed at around 30-50% is generally recommended. This provides enough cooling to solidify the filament quickly, but not so much that it cools too rapidly and causes warping.
For the Minimum Layer Time for Nylon, a good starting point is around 10 seconds. However, you may need to adjust this based on the size and complexity of your print, and Regular Fan Speed at Height is at the 0.4 to 0.6 mm layer height.

Cooling FAQ For 3D Printing:

Cooling in 3D printing is crucial for ensuring the proper solidification of the material as it’s deposited. Effective cooling helps in reducing warping, improving print quality, and achieving better detail, especially in overhangs and bridges.
Absolutely, using fans to cool down PLA 3D prints really helps to make them look better. There are special fan covers that aim the air right at the parts being printed, which makes things like overhangs, bridges, and fine details turn out much nicer. I suggest using really good fans at their maximum speed for PLA 3D prints.
Not necessarily. While maximum cooling is beneficial for materials like PLA, excessive cooling for materials like ABS can lead to layer separation and poor bed adhesion. Adjust the fan speed according to the material and the geometry of your print.